|
MATERIALS:
- One pair of Red Heel Socks (Rockford Red Heel
Socks of Osage, Iowa are the best socks to use. Places that sell
them can be found on the internet.)
- Polyester Fiberfil
INSTRUCTIONS:
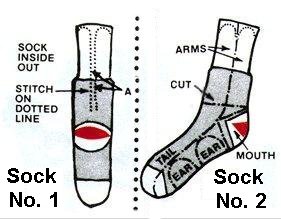
TURN THE SOCKS INSIDE OUT
Sock #1:
Sew a seam (A) ½" on both sides of the
center of sock starting three inches from the white heel and across the
end of the top. Cut the sock between the seams and to within
1½" of white heel. This leaves an opening in the crotch.
Then turn the sock so the seams are on the inside
and use the crotch opening to stuff the head, body and legs.
The
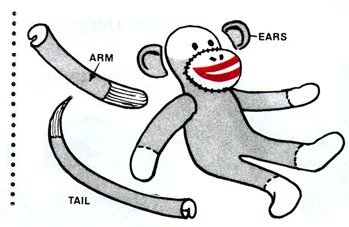
ARMS, MOUTH, TAIL, AND EARS are cut from Sock #2:
ARMS:
Cut the upper part of the sock into two pieces. Sew, rounding the
ends and stuff the arms.
MOUTH:
Cut the heel from the sock, leaving a brown edge around the
white. Fasten on lower part of the face, whip-stitching around
the bottom; stuff and finish sewing around the top. To enhance
the mouth, a running stitch of either black or white yarn can be made
across the middle of the lips.
TAIL:
Cut a one inch strip, taper to end of cuff on length of front of
sock. Sew and stuff.
EARS:
Cut the ears from the remaining brown part of the sole of the sock.
EYES:
The eyes can be buttons, felt,
or even wiggle
eyes, but for young children it is best to embroider eyes on
the sock with black floss.
The CAP is optional, but if you want to put a
cap on the monkey, you will need another sock.
Cut off the toe of a third sock, leaving ½" of brown to roll for
a brim.
|