
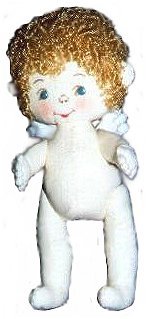
10" Jointed Cherub
© 1998 Gail Kellison
Pattern Page 1
After printing the pattern, cut out the pieces. Set the stitch length on your sewing machine for the tiniest stitch.
Right
sides facing, fold the 13" x 26" piece of fabric for the body in half
so it measures 13" x 13".
Pin the pattern pieces to the fabric and cut out the pieces. Be
sure to cut 2 sets of legs. Use tracing paper to mark the darts
on the wrong side of both fabric head pieces and to mark the darts at
the wrist on the wrong side of the inner arm pieces.
Pin the head pattern to one of the fabric head pieces on the right side of the fabric, matching the edges of the pattern to the edges of the fabric. Trace the facial features on the pattern to the fabric.
The Head: Make the darts on the wrong side in both head pieces. Place the two head pieces together, right sides facing, matching the darts and the ears. Sew around the head, leaving the bottom open as shown on the pattern. Clip the fabric above and below each ear.. Turn the head right side out through the opening at the bottom.
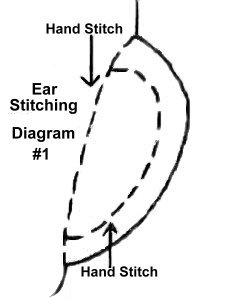
The Ears: Use the blunt end of a chop stick to push a small amount of stuffing into one ear. Thread a needle with thread that matches the fabric. Double the thread and knot the ends together. Insert the needle up through the neck. Exit at the top of the ear. Use Diagram #1 as a guide. First stitch from the top of the ear to the bottom of the ear. Then stitch around the ear approx. ¼" from the outer edge. Repeat for the other ear.
|
|
 |
When both ears are finished, stuff the head firmly. Spray the face lightly with acrylic spray. Let dry and spray it again lightly with acrylic spray. Let dry.
The Body: While the face is drying, work on the rest of the doll body. Begin by placing the two body front pieces together, right sides facing. Sew the center front seam from A to B.
Right sides facing and matching the raw edges, sew the Body Front to the Body Back - all the way around, leaving an opening on one side. Turn the body right side out through the opening. Use the blunt end of a chopstick and small amounts of stuffing to stuff the neck firmly. Continue to stuff the whole body firmly. Do NOT close the opening at the side of the body at this time. This will be done later.
Legs: Right sides facing, sew two leg pieces together. Leave the opening shown on the pattern. Clip curves. Turn right side out through the opening and stuff the leg firmly. Repeat for the other leg. Fold in the seam allowance of the openings and hand stitch to close.
Arms: Make the dart on the wrong side of the fabric at the wrist of each inner arm. Right sides facing, sew one inner arm to one outer arm matching the raw edges. Leave the opening shown on the pattern for turning. Sew very slowly and carefully around the fingers (if you prefer, you can hand stitch around the fingers. If you do, use very tiny stitches). Clip the fabric to the seam line at the wrist and between the fingers. Be careful to not clip the seam.
Turn the arm right side out. Use the chopstick to push small amounts of stuffing into each finger. Stuff firmly. Continue on to stuff the entire arm firmly. Repeat for the other arm.
Thread a 3" doll needle with 30" of thread. Double the thread and knot the ends. Insert the needle into the opening left for turning. Exit the needle at the seam line between the thumb and first finger. Make two small stitches (Use the pattern as a guide). Exit the needle (after making the last stitch) between the 1st and 2nd finger at the seam line. Make 3 small stitches. Exit the needle after the last stitch between the next two fingers. Continue until all of the fingers are made. Then exit the needle out at the opening left for turning. Tie off the thread at the edge of the opening's seam allowance. Clip any excess thread. Turn in the seam allowance and hand stitch to close the opening. Repeat for the other arm.
The Face: Make sure that the acrylic spray is totally dry on the face before you begin using the colored pens on it. The pens need to be permanent ink and ultra fine. The ones I use are LePlume II brand. There are many good pens to use, but these are the ones I prefer. Use a brown pen to make the eyebrows and nose. Outline the eyes with the brown pen as well.
Color in the eyes with a light blue pen. Using the head of a straight pin and white acrylic paint, make a dot in each eye This is thehig hlight. Outline and fill in the mouth with a red pen. Use the color face picture as a guide for placing the white highlight in each eye.
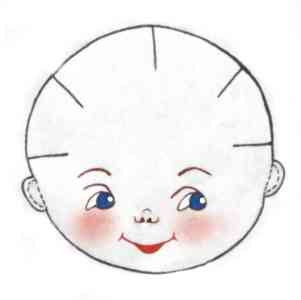
Apply the facial blush to the cheeks. I do this using my little finger (my pinky finger). A cotton swab can also be used. I just feel I have more control by applying the blush to my finger and then rubbing lightly in a circular motion on each cheek.
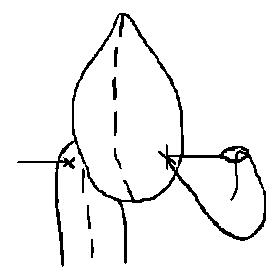
Making certain to have the foot toward the front of the body, insert the needle on the inside of the upper leg at the "x". Exit the needle on the outside of the upper leg (at the "x"). Make a small stitch and go back through the leg and the body coming out on the other side of the lower body at the "x" where the first small stitch was made. See Diagram #2
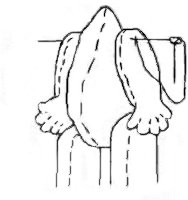
Attach the other leg the same way you did the first one. Pull the thread tight. Insert the needle back into the second leg and back through the body. Exit on the outside of the first leg at the "x". Pull the thread tight. Repeat this process 4 times. Diagram #3. Exit the needle the last time between the body and the leg. Remove the needle from the thread. Wrap the thread around the stitches between the body and the leg and insert the end of the thread through the loop. Pull the end of the thread tight. Repeat wrapping the thread around the stitches again to make a knot. Pull the thread tight and clip off any excess thread.
 |
 |
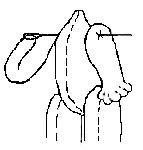
Attach the arms the same way, using the "x"'s at the top part of the body. Be certain to have the thumbs facing toward the front of the body. Diagrams #4 and #5.
 |
 |
When
the arms and legs are attached, fold the seam allowance on the side of
the body to the inside, and hand stitch to close the back opening.
Turn under the ¼" seam allowance at the neck edge of the
head and
place it on the pointed neck at the top of the body. Be
sure the face is toward the front of
the body. (You can tilt the head to one side if you prefer
or sit it on straight). Hand stitch the neck to the
body.
Wings: Right sides facing, sew one one set of wings together matching the raw edges. Leave the straight edge open for turning. Sew very slowly and carefully around the wing (if you prefer, you can hand stitch around the fingers. If you do, use very tiny stitches). Clip the fabric to the seam line as shown on the pattern. Be careful to not clip the seam. Turn the wing right side out.
Use the chopstick to push small amounts of stuffing into the wing tips. Stuff firmly. Continue on to stuff the entire wing. Repeat for the other wing.
Thread a 3" doll needle with 30" of thread. Double the thread and knot the ends. Insert the needle into the opening left for turning. Exit the needle at the seam line between two wing tips. Make two small stitches (Use the pattern as a guide). Exit the needle (after making the last stitch) between the next two wing tips at the seam line. Make 3 small stitches. Exit the needle after the last stitch between the last two wing tips. Make 3 small stitches. Then exit the needle out at the opening left for turning. Tie off the thread at the edge of the opening's seam allowance. Clip any excess thread. Turn in the seam allowance and hand stitch to close the opening. Repeat for the other wing.
Sew the wings (both sides of the straight edge) to the body back using a ladder stitch. The pattern shows the placement of each one.
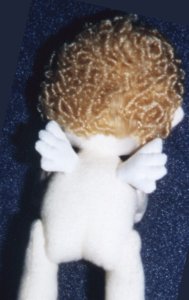
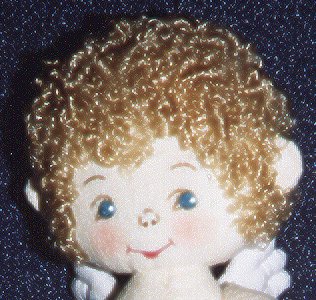
Hair: Cut a small amount of the strawberry blonde curly hair and roll it 4 or 5 times between the palms of your hands. Use Beacon's Fabric Tac glue and glue it to the forehead between and just above the eyebrows. Continue to cut small amounts of hair, roll it, and glue it to the head until the whole head is covered. Don't cover the ears with hair. You want to let the ears peak out through the hair. Glue a small amount in front of each ear and place more hair behind each one.
Your
"Little Love" Cherub is now complete.